Images - How information is stored in them (Basic)
What are images? In a physical real world, they are a collection of pigments which make up a meaningful form. In a virtual world, the same thing exists, except that you are looking at different colored lights instead of pigments. Your monitor displays these colors and they form up images.
Monitors old or new, are based on the model of RGB, standing for Red Green Blue. The combination of these lights creates a sense of colors. So, the images that you take through your digital camera, that you create on imaging software like Photoshop are made of these tiny little pixels. Your monitor just assigns each pixel coming from the image a specific position on the screen. The color information is also matched and hence you get a display of the image.
Let’s get practical now.
- Fire up Photoshop and create a 4x4 pixel document (4x4 means 4 pixels wide and 4 pixels high, that is 16 pixels in total – and that’s really small for you).
- Zoom into the document (3200% - 3200 times the normal size).
- If you are using a newer version of Photoshop (as far as I know, the older ones do not have it) you will be seeing a light grid that goes across the image. This grid is the pixel grid.
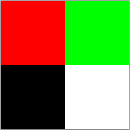
- Take the rectangular marquee tool and select a 2x2 square from the top. Fill it up with a nice bright color. Repeat the step and fill up the rest of the grid.
- This is what I made. Try making something like this or you could fill up the 16 pixels with 16 different colors.
BTW, each color is made up of a set of values. It’s a combination of the colors. You’ll see these values whenever you are picking up colors from a color picker. The most common combination is the RGB combination, which as we have seen is popular because of its use in electrical display. Each color in the RGB set can take integral values from 0 to 255 (or 00 to FF in hex format) – i.e., each color is a byte long (2^8 = 256 = 1 byte). There are other sets like CMYK, HSB etc., and they too follow a similar structure.
Coming back to our Photoshop, save the document in the ‘Photoshop RAW’ format (extension = .RAW). A series of dialog boxes open up; just leave them to their default values and click OK. I’ll discuss what these options mean later in this post. I’ll also explain why I particularly chose RAW format for this little thing.
Browse to the folder where you have saved the RAW image file. Check the size of the image file. You should be getting a value of 48 bytes precisely. This happens because you used 16 pixels. And each pixel contains a data of 3 bytes (RGB color values). 16*3 = 48. Hence 48 bytes
Open up the image using notepad. You’ll be seeing a series of blanks or some random characters based on what colors you have chosen.
This was the result for me:
ÿ ÿ ÿ ÿ ÿ ÿ ÿ ÿ ÿÿÿÿÿÿ ÿÿÿÿÿÿ
This may seem random, but this is the pixel data that created the image, hence it does contain some meaning.
Let’s go into this a little deep and explore the Hexadecimal values of the image. For doing this, you need a software called – XVI32. It is a simple, free hex-editor and you can download it here.
Unzip the files and open up XVI32.exe. No installation needed.
Drag the RAW image file onto the XVI32. You’ll now see that the right side of the editor shows the same values that Notepad showed you. The left side contains the hex values of the data in the file.
If you haven’t messed around with the settings while saving the RAW file, you should be able to observe a pattern here.
FF 00 00 = (255,0,0) = Red – repeats twice
00 FF 00 = (0,255,0) = Green – repeats twice
The above two lines repeat again and then:
00 00 00 = (0,0,0) = Black – repeats twice
FF FF FF = (255,255,255) = White – repeats twice
The above two lines repeat again.
This should be obvious by now, that the RAW file stored the image data in terms of Red channel, Green Channel and Blue channel – pixel by pixel going row wise. The values on the right side are the ASCII/windows-1252 values of the same data. The windows-1252 value of FF is a y with a ‘dieresis’.
Now, coming to why I chose RAW: It’s the (only?) format which does not use any algorithm and add some random talk at the end. Try making sense out of other formats – the size for a 16 pixel image will be around 12 Kb and will contain a different way of representing the pixel information.
About the options in the file saving box:
- Header: A normal RAW file from a camera contains some data about the image taken. This data occupies some amount of space. The same thing can be done with Photoshop, but you get all blanks in the place of header information. Simply put, when you enter a value in this place, your pixel-color information offsets by that amount. Your file size will also increase proportionally
- Save Channels in Interleaved order or Non-interleaved order: The first option saves the file in the format Pixel(Red, Green, Blue). The second option saves the file in the format Red(Pixels), Green(Pixels), Blue(Pixels). All red pixels are grouped as one, then all green pixels, and blue pixels in the second format.
- More information on RAW - the wikipedia article
I still haven’t thought about the next episode, might be Image manipulation using MATLAB

